
Vision. Goals. Execution.
Imagine ending up with streamlined workflows, impeccable service, and exceeding client expectations—all while regaining that work-life balance you’ve been dreaming of. We’re laser-focused on tailoring our consulting services to your needs, whether it’s optimizing your tools, implementing new systems, or revolutionizing your entire workflow. With Comer Technology Group, technology becomes your greatest ally, propelling you towards unrivalled success.
Read the latest news and updates

CW Manage: Getting Started with PowerBI (The Update!!)
This is an update to a previous post. See the original here: https://comertechnology.com/cw-manage-getting-started-with-powerbi/
One thing that really had been bugging me was the absence of the capability of passing a URL test in the previous data source. In this article, I have the updated data sources as well as an explanation of what changed.
Useful Information/Links
Postman – Postman makes getting started with API and API Development a breeze. For a newbie, they make it very easy and there is a lot of documentation and guides out there surrounding Postman in use for testing and developing with numerous APIs.
ConnectWise Developer Network – This website provides access to the API library, database library and everything else you could desire for getting started with developing/automating/reporting from the ConnectWise suite. Best part — its FREE.
MSPGeek (Formerly LabTechGeek) Community – This community is a good resource for “all things ConnectWise” and is a fantastic resource for anyone new to the community.
Base64Encode – This website is useful for generating your authorization token instead of using Basic authentication.
Requirements
PowerBI (obviously) – If you are going to programatically refresh data or schedule data to refresh – when using an API/JSon datasource you need to configure an “on-premise data gateway”. Power BI will reference the gateway as a source which will reference the web source.
CW Manage API Member – https://comertechnology.com/getting-started-with-cw-manage-rest-api/
Base64 Conversion of the Public and Private key (Recommended, not required)
ConnectWise Client ID – You must sign up on the developer website and have a “Client ID”. https://developer.connectwise.com/ClientID
Process
Convert your Basic authentication to an authorization token.
Go to http://base64encode.org > Type in “CompanyID+PublicKey:PrivateKey” and encode it. This is your authorization token.
Create a new Dashboard in Power BI
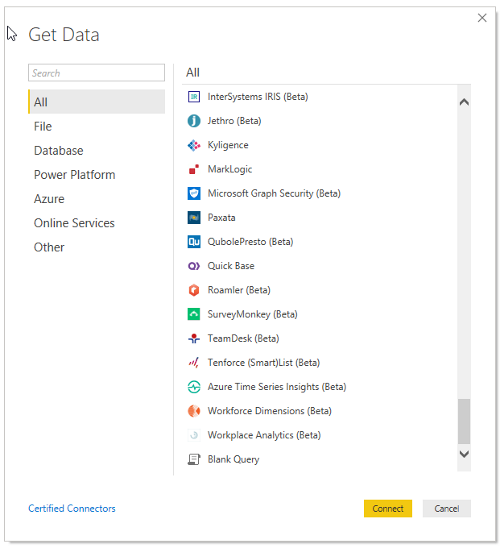
Press Get Data > Select “Blank Query” (I will provide you a query below).
In this example, we will use two queries. The API has a maximum return of 1,000 records. To get around this we will have an initial query to loop through all the pages until there are no more and a second to use that as our source.
Right Click > on the new query.
Select “Rename” > Name: PageData
Select “Advanced Editor” and paste the following code. You will need to modify the following sections:
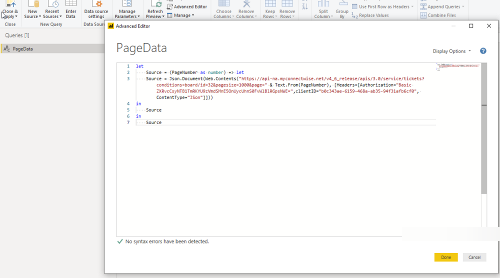
<BOARDIDHERE> – If you want to specify a board, if not you can remove “?conditions=Board/id=x”
<AUTHORIZATIONHERE> – This is the Authorization token you generated by encoding your CompanyID+PublicKey:PrivateKey to Base64
<CLIENTIDHERE> – This is the Client ID you have generated at the CW Developer site.
let Source = (PageNumber as number) => let Source = Json.Document(Web.Contents("https://api-na.myconnectwise.net/v4_6_release/apis/3.0/service/tickets",[RelativePath="?conditions=board/id=<BOARDIDHERE>&pagesize=1000&Page="&Number.ToText(PageNumber),Headers=[Authorization="Basic <AUTHORIZATIONHERE>",clientID="<CLIENTIDHERE>", ContentType="JSon"]])) in Source in SourceWhat changed? Well, we changed the URL in the “Web.Contents” section to reference a “Relative Path”. This change made it so that anything in the static URL path is used for the “URL test” that Power BI does during a refresh. Then, the Relative Path is added onto the end including the page number. Since we are using variables in our URL, Power BI could not verify the original URL since it wasn’t “static”.
Right click in the “Queries” section > Click New Query > Blank Query.
Right click on our new query and rename it as you wish.
Right click > Advanced Editor. This is where will specify our data from the PageData source. You can find the code at the bottom under “AllData”.
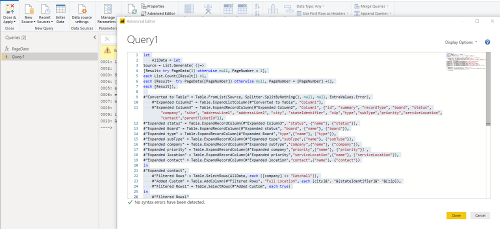
In this case, I have already converted the results to a table and expanded several columns. You can modify these to your choosing or start from scratch.
Press Close & Apply.
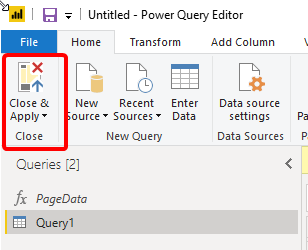
The data will refresh and you are ready to create your visualizations.
PageData Code
let
Source = (PageNumber as number) => let
Source = Json.Document(Web.Contents("https://api-na.myconnectwise.net/v4_6_release/apis/3.0/service/tickets",[RelativePath="?conditions=board/id=<BOARDIDHERE>&pagesize=1000&Page="&Number.ToText(PageNumber),Headers=[Authorization="Basic <AUTHORIZATIONHERE>",clientID="<CLIENTIDHERE>", ContentType="JSon"]]))
in
Source
in
SourceAllData Code
let AllData =
let Source = List.Generate( ()=> [Result= try PageData(1) otherwise null, PageNumber = 1], each List.Count([Result]) >1, each [Result=  try PageData([PageNumber]) otherwise null, PageNumber = [PageNumber] +1], each [Result]),
#"Converted to Table" = Table.FromList(Source, Splitter.SplitByNothing(), null, null, ExtraValues.Error),
#"Expanded Column2" = Table.ExpandListColumn(#"Converted to Table", "Column1"),
#"Expanded Column3" = Table.ExpandRecordColumn(#"Expanded Column2", "Column1", {"id", "summary", "recordType", "board", "status", "company", "site", "addressLine1", "addressLine2", "city", "stateIdentifier", "zip","type","subType","priority","serviceLocation","contact","parentTicketId"}),
#"Expanded status" = Table.ExpandRecordColumn(#"Expanded Column3", "status", {"name"}, {"status"}),
#"Expanded Board" = Table.ExpandRecordColumn(#"Expanded status", "board", {"name"}, {"board"}),
#"Expanded type" = Table.ExpandRecordColumn(#"Expanded Board","type",{"name"}, {"type"}),
#"Expanded subType" = Table.ExpandRecordColumn(#"Expanded type","subType",{"name"}, {"subType"}),
#"Expanded company" = Table.ExpandRecordColumn(#"Expanded subType","company",{"name"}, {"company"}), #"Expanded priority" = Table.ExpandRecordColumn(#"Expanded company","priority",{"name"}, {"priority"}),
#"Expanded location" = Table.ExpandRecordColumn(#"Expanded priority","serviceLocation",{"name"}, {"serviceLocation"}), #"Expanded contact" = Table.ExpandRecordColumn(#"Expanded location","contact",{"name"}, {"contact"})
in
#"Expanded contact"
in
AllData
Examples
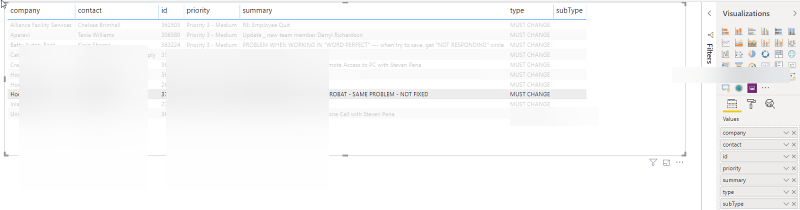
We can create a basic table showing all “New” tickets with the below. Now, we have a number of statuses that are duplicates (i.e., New and New*). In our case, anything with an asterisk has a notification step. So, you can use a new column with “Fuzzy Matching” to concatenate the two statuses.
Select the “Table” visual.
In “Filters on this visual” > Drag “Status” over. Select the status you want to filter on. In our case, New*.

Under Visualizations > Values (after selecting the table) > “Add data fields here” > Drag the Fields you would like to be displayed. Or, just check them.
Voila! You have a basic table containing the columns you selected and filtering on the “New” status.


Comer Technology Group provides exceptional business consulting services, management, and training in RMM and PSA – offering their service throughout all regions of the world.
Follow Us:

